

Share this article:
.svg)


.svg)
.svg)

Key Takeaways from this article
- Lean process improvement in construction starts with seeing your project as a production system, where you reduce waste and variability instead of pushing people harder.
- Lean principles alone don’t change projects – you need simple, repeatable routines for planning, coordination, and site execution that make Lean visible in daily work.
- A clear current-state picture and a small set of measurable Lean goals (e.g. PPC, constraints, rework) are the foundation for any meaningful improvement.
- A cross-functional Lean core team is essential to connect those goals to day-to-day decisions and keep problems visible instead of hidden.
- You don’t need every Lean tool at once – pick a focused starter set (Last Planner, pull, takt, 5S) that fits your specific process problems.
- Lean routines only stick if they live in your construction planning software, so that the plan on the wall, in the tool, and on site tell the same story.
Some of the most frustrating projects today aren’t the ones that ignore Lean.
They’re the ones that are almost Lean.
Teams run pull sessions, talk about waste reduction and continuous improvement, maybe even follow a Lean construction checklist. But design changes still explode the schedule. Trades still stack up in the same zone. The plan still collapses under real-world constraints.
“Almost Lean” hurts twice: it adds ceremony without fixing the construction process underneath. Surveys show that many “Lean” projects only apply isolated tools or planning rituals – without the behaviours, measurement and follow-through – and then struggle to show results.
How to Turn Lean Construction Principles Into a Practical Process
Lean process improvement is designed to do the opposite – to simplify, stabilise and clarify how construction projects run day to day. On real projects, full Lean implementations with Last Planner, clear roles and simple metrics improved schedule reliability and PPC, and even cut project time by around 15%.
If you’re serious about making Lean visible in your weekly plan, keep reading. We will strip Lean construction back to what matters: 8 practical steps that connect principles, planning routines and digital tools into one coherent way of delivering work on your projects.
Where Lean Process Improvement Breaks Down on Real Construction Projects
Even when everyone agrees Lean construction “makes sense”, many projects still end in the same overruns, conflicts and firefighting. The workshops happened, the language changed, but the project plan failures look familiar.
Before we look at how to implement Lean, it helps to name the patterns that drag most “Lean” initiatives back into business as usual.
5 Reasons Lean Construction Projects Still Fail on Site
Most Lean construction initiatives stall for 5 predictable reasons:
- No clear problem definition
Teams talk about “being Lean” without first agreeing on what exactly needs to improve: schedule reliability, rework, safety, logistics, cashflow, or all of the above. - Principles without process
People hear about Lean principles and the Toyota Production System as a new production philosophy from the manufacturing sector, but no one translates them into specific routines in planning, coordination and on construction sites. - Tools without behaviour change
New boards, templates or software features are introduced, but the underlying habits stay the same. Meetings still run as status updates, not as process improvement forums. - No measurement and feedback
Without simple key performance indicators – like PPC (Percent Plan Complete), constraint removal rate or flow stability – it’s impossible to see whether Lean practices are working or just adding noise. - No link to digital planning tools
Workshops and post-its live in isolation from the actual construction process and project management systems. The plan in the software and the plan “on the wall” diverge, and people quickly lose trust.
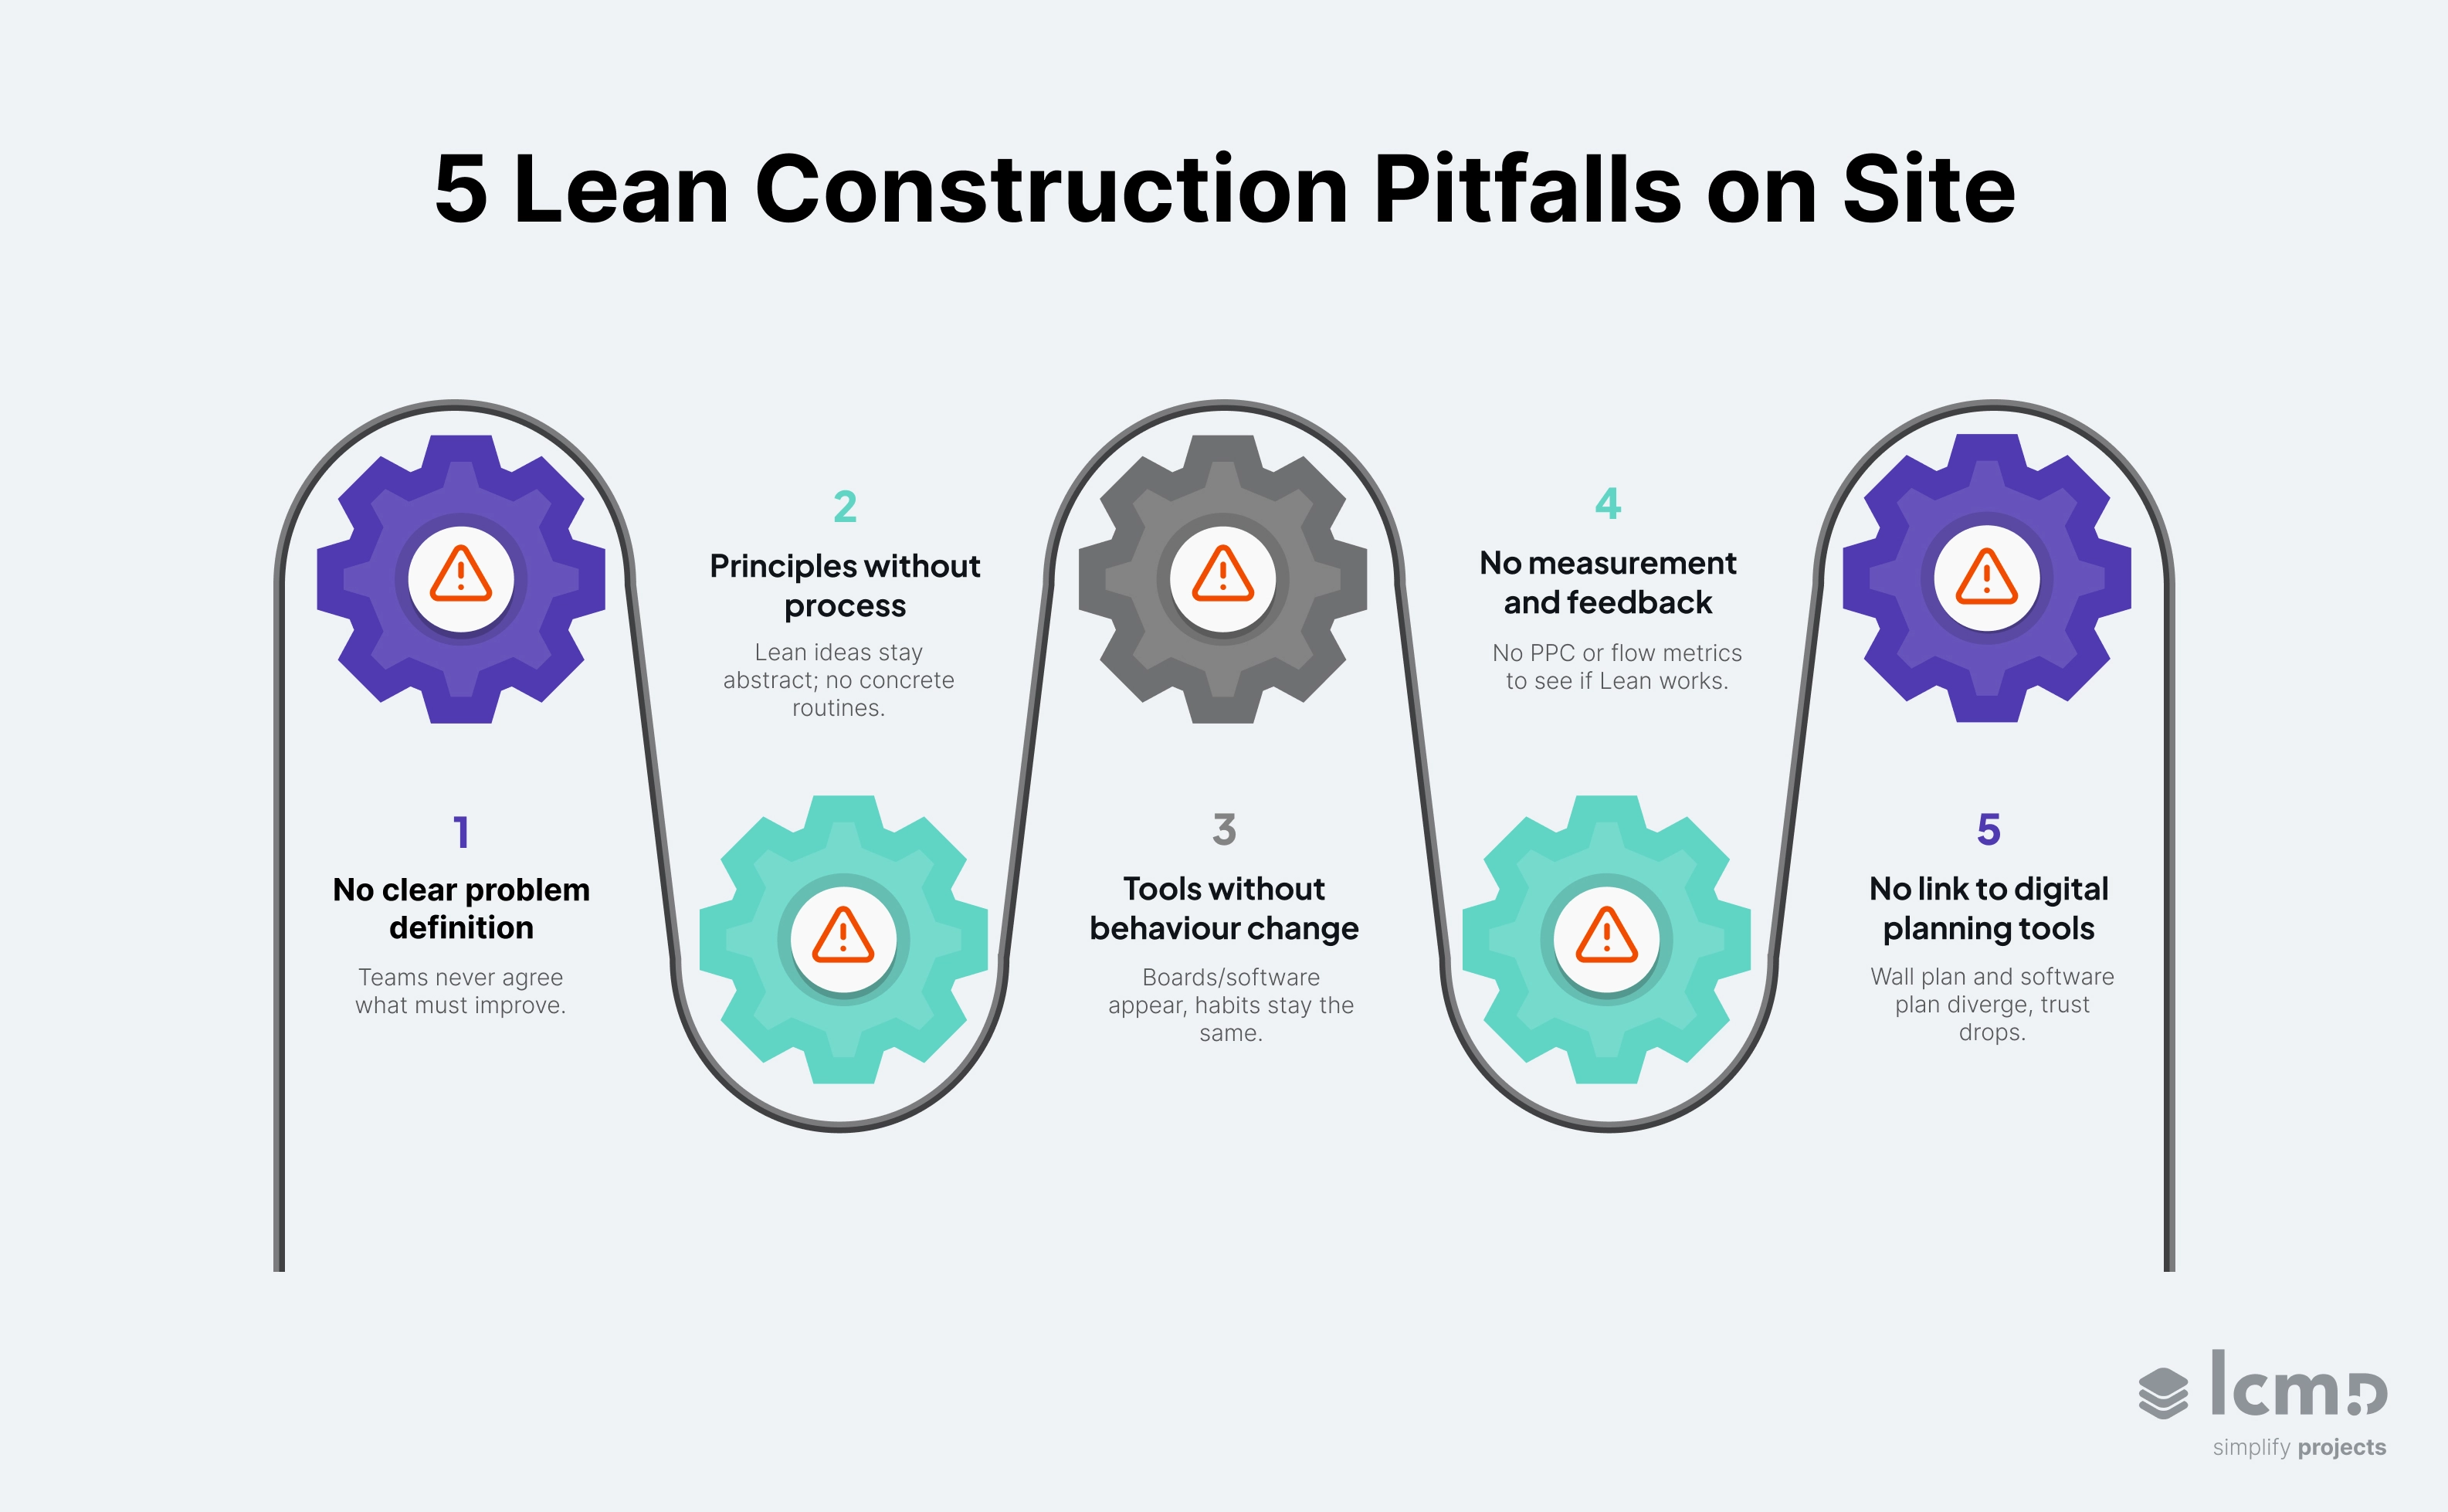
Large Lean construction studies have observed the same patterns across many projects, which is why these five are a reliable way to spot when a project is drifting into “almost Lean” instead of real process improvement.
Why You Need a Clear Lean Process Improvement Path
The result is painful and familiar: everyone agrees Lean construction “makes sense in theory”, but on live projects it’s seen as extra work. Without a clear Lean process improvement path every team invents its own version of “Lean”, and the initiative slowly loses credibility.
So how do you avoid becoming another “almost Lean” project and build a process that actually changes delivery?
The next step is to define what Lean process improvement in construction really is – and turn it into a practical path you can follow.
What is Lean process improvement in construction?
At its core, Lean process improvement is a systematic way to make a process flow better by focusing on what customers value and removing everything that does not contribute to that value.
In construction, that means looking beyond individual activities and asking:
- How does information, work and material really flow through our project?
- Where do we create value for the client – and where do we just move problems downstream?
- How can we redesign the construction process so trades, suppliers and project participants work in a more stable, predictable way?
3 Key Concepts in Lean Construction Management
Lean process improvement in construction takes the classic principles of Lean thinking and applies them to construction projects, construction management and construction sites – with all their uncertainty, interfaces and constraints.
To do that in a structured way, Lean construction management relies on 3 foundational Lean concepts:
- Lean principles
- Waste reduction and workplace organisation
- Continuous improvement cycle for project delivery
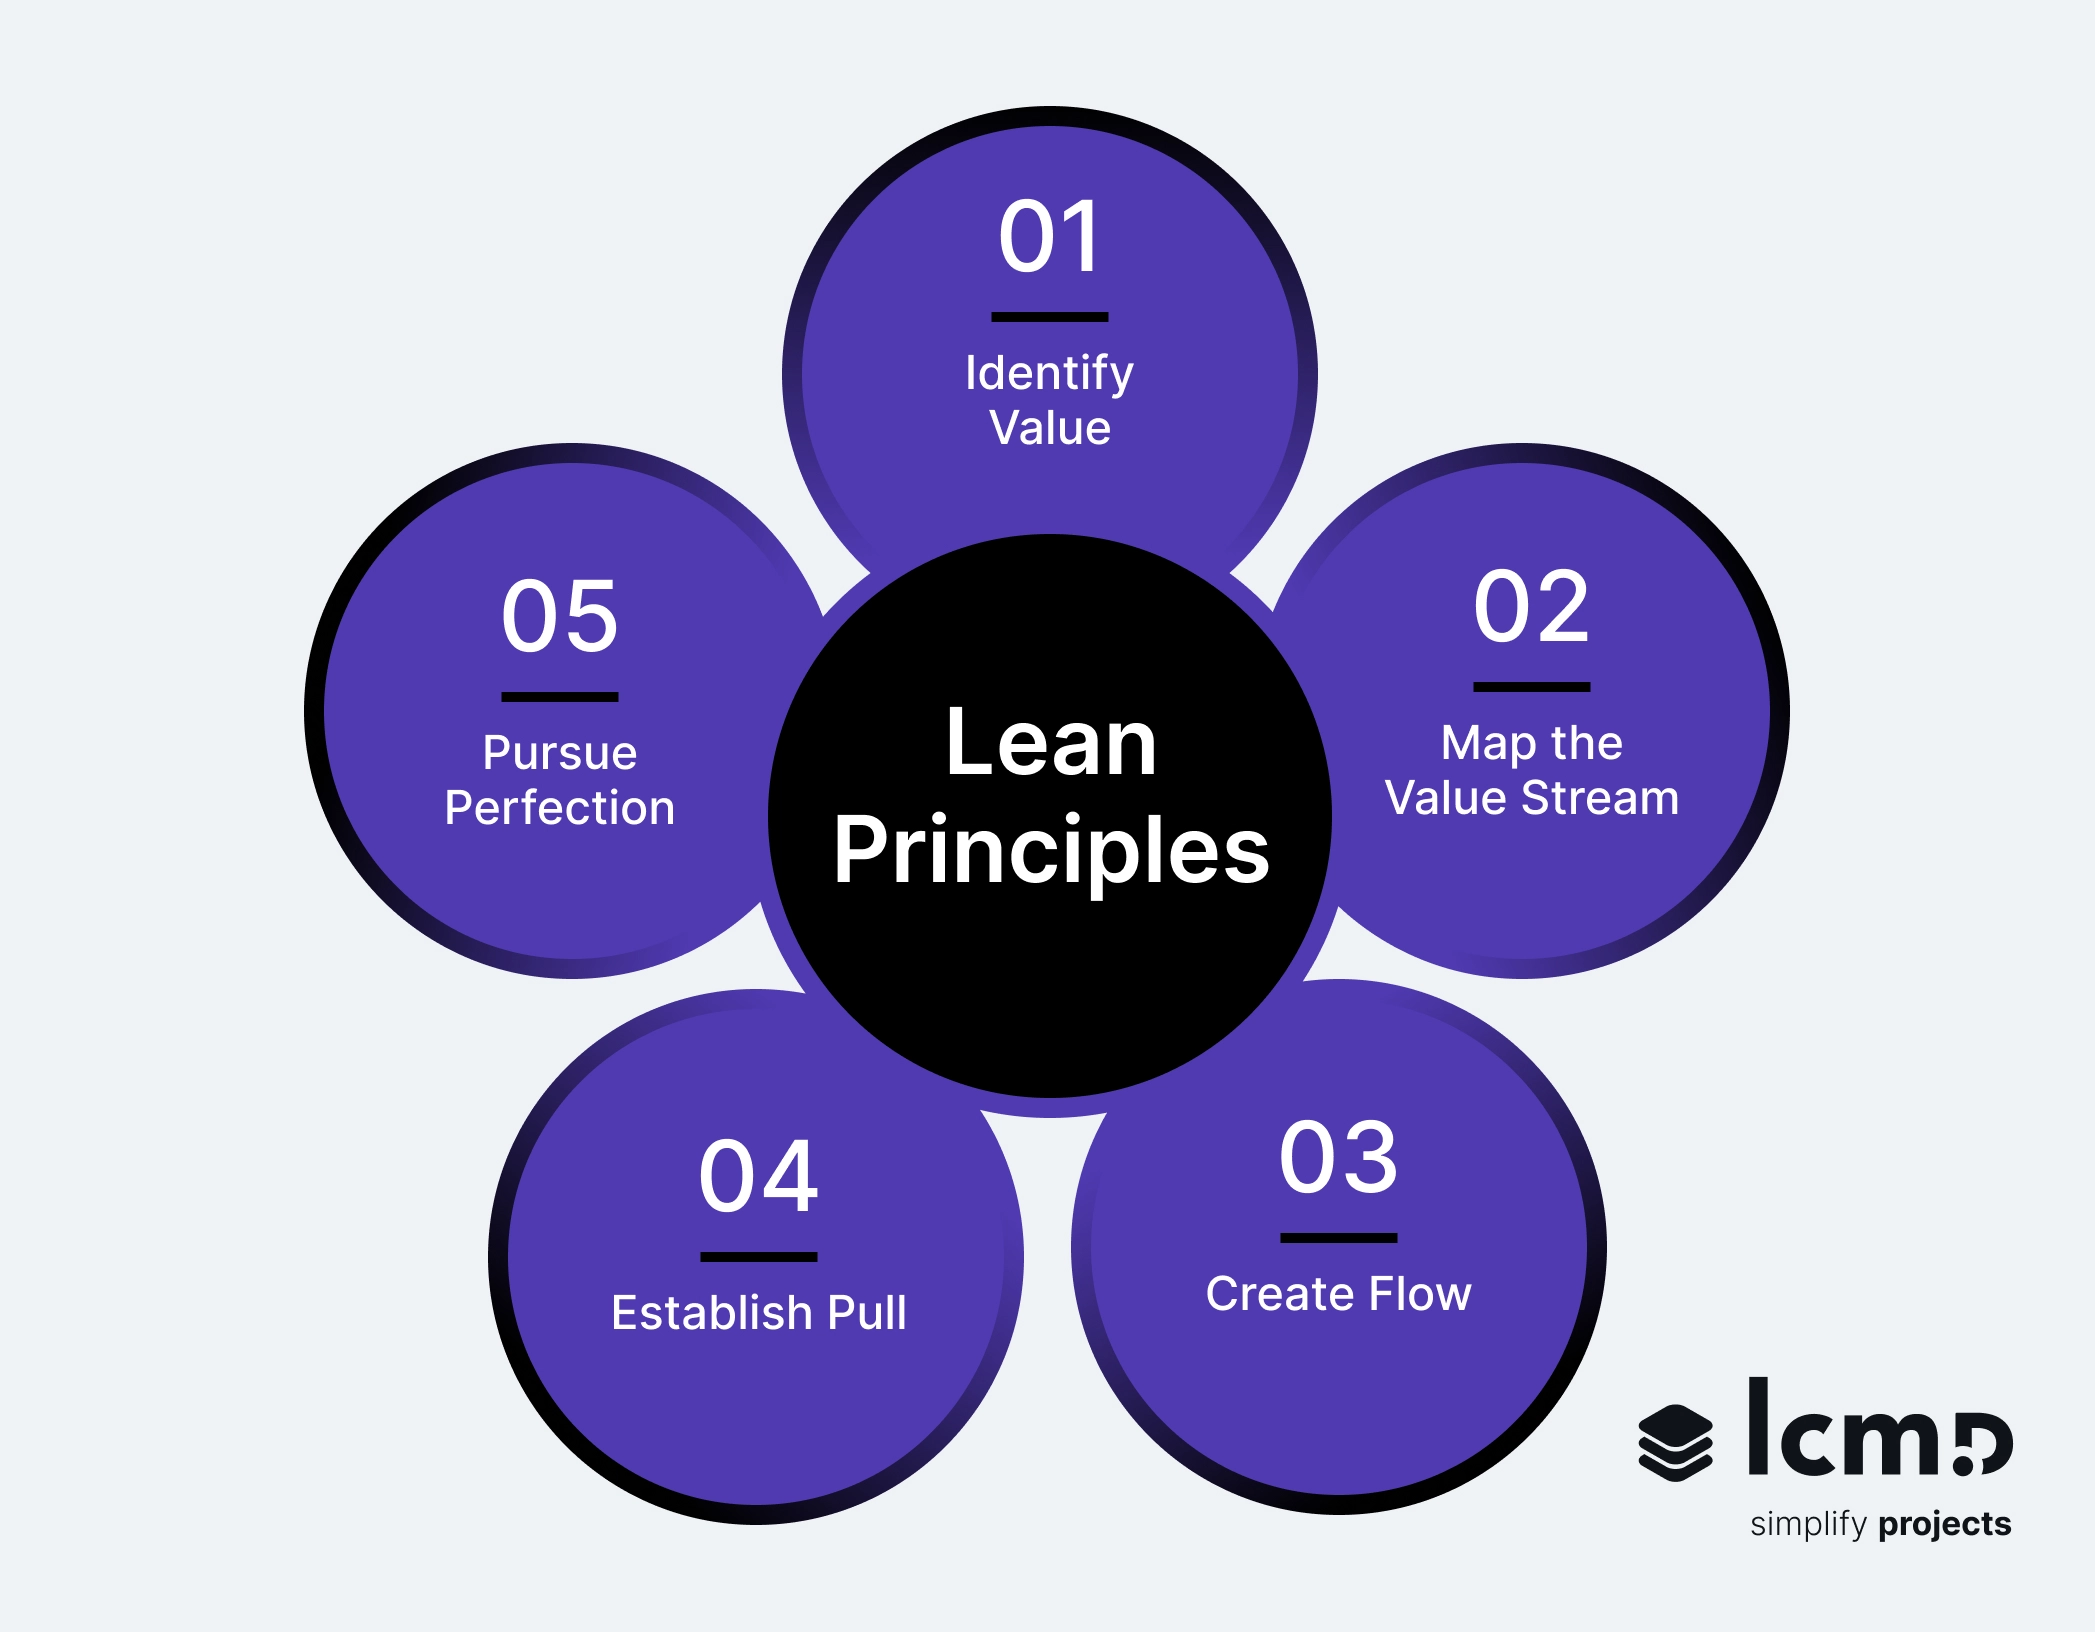
1. Lean principles
Most Lean approaches, whether in manufacturing or the construction industry, are built on 5 core principles of Lean thinking:
- Identify value – What does the client or end user actually care about (time, quality, cost, flexibility, sustainability)?
- Map the value stream – How does work, information and material move from concept to handover? Where are the delays, rework and hand-offs?
- Create flow – Reorganise the process so work moves more smoothly, with fewer stops and starts.
- Establish pull – Let downstream needs drive upstream work, instead of pushing tasks into the system “just in case”.
- Pursue Perfection – Keep adjusting the process using data, feedback and small experiments.
In construction, these Lean principles guide design, planning and execution – not just the manufacturing process of building components.
To make those principles visible on site, Lean construction combines them with a strong focus on waste reduction and workplace organisation.
2. Waste and workplace organisation in Lean construction
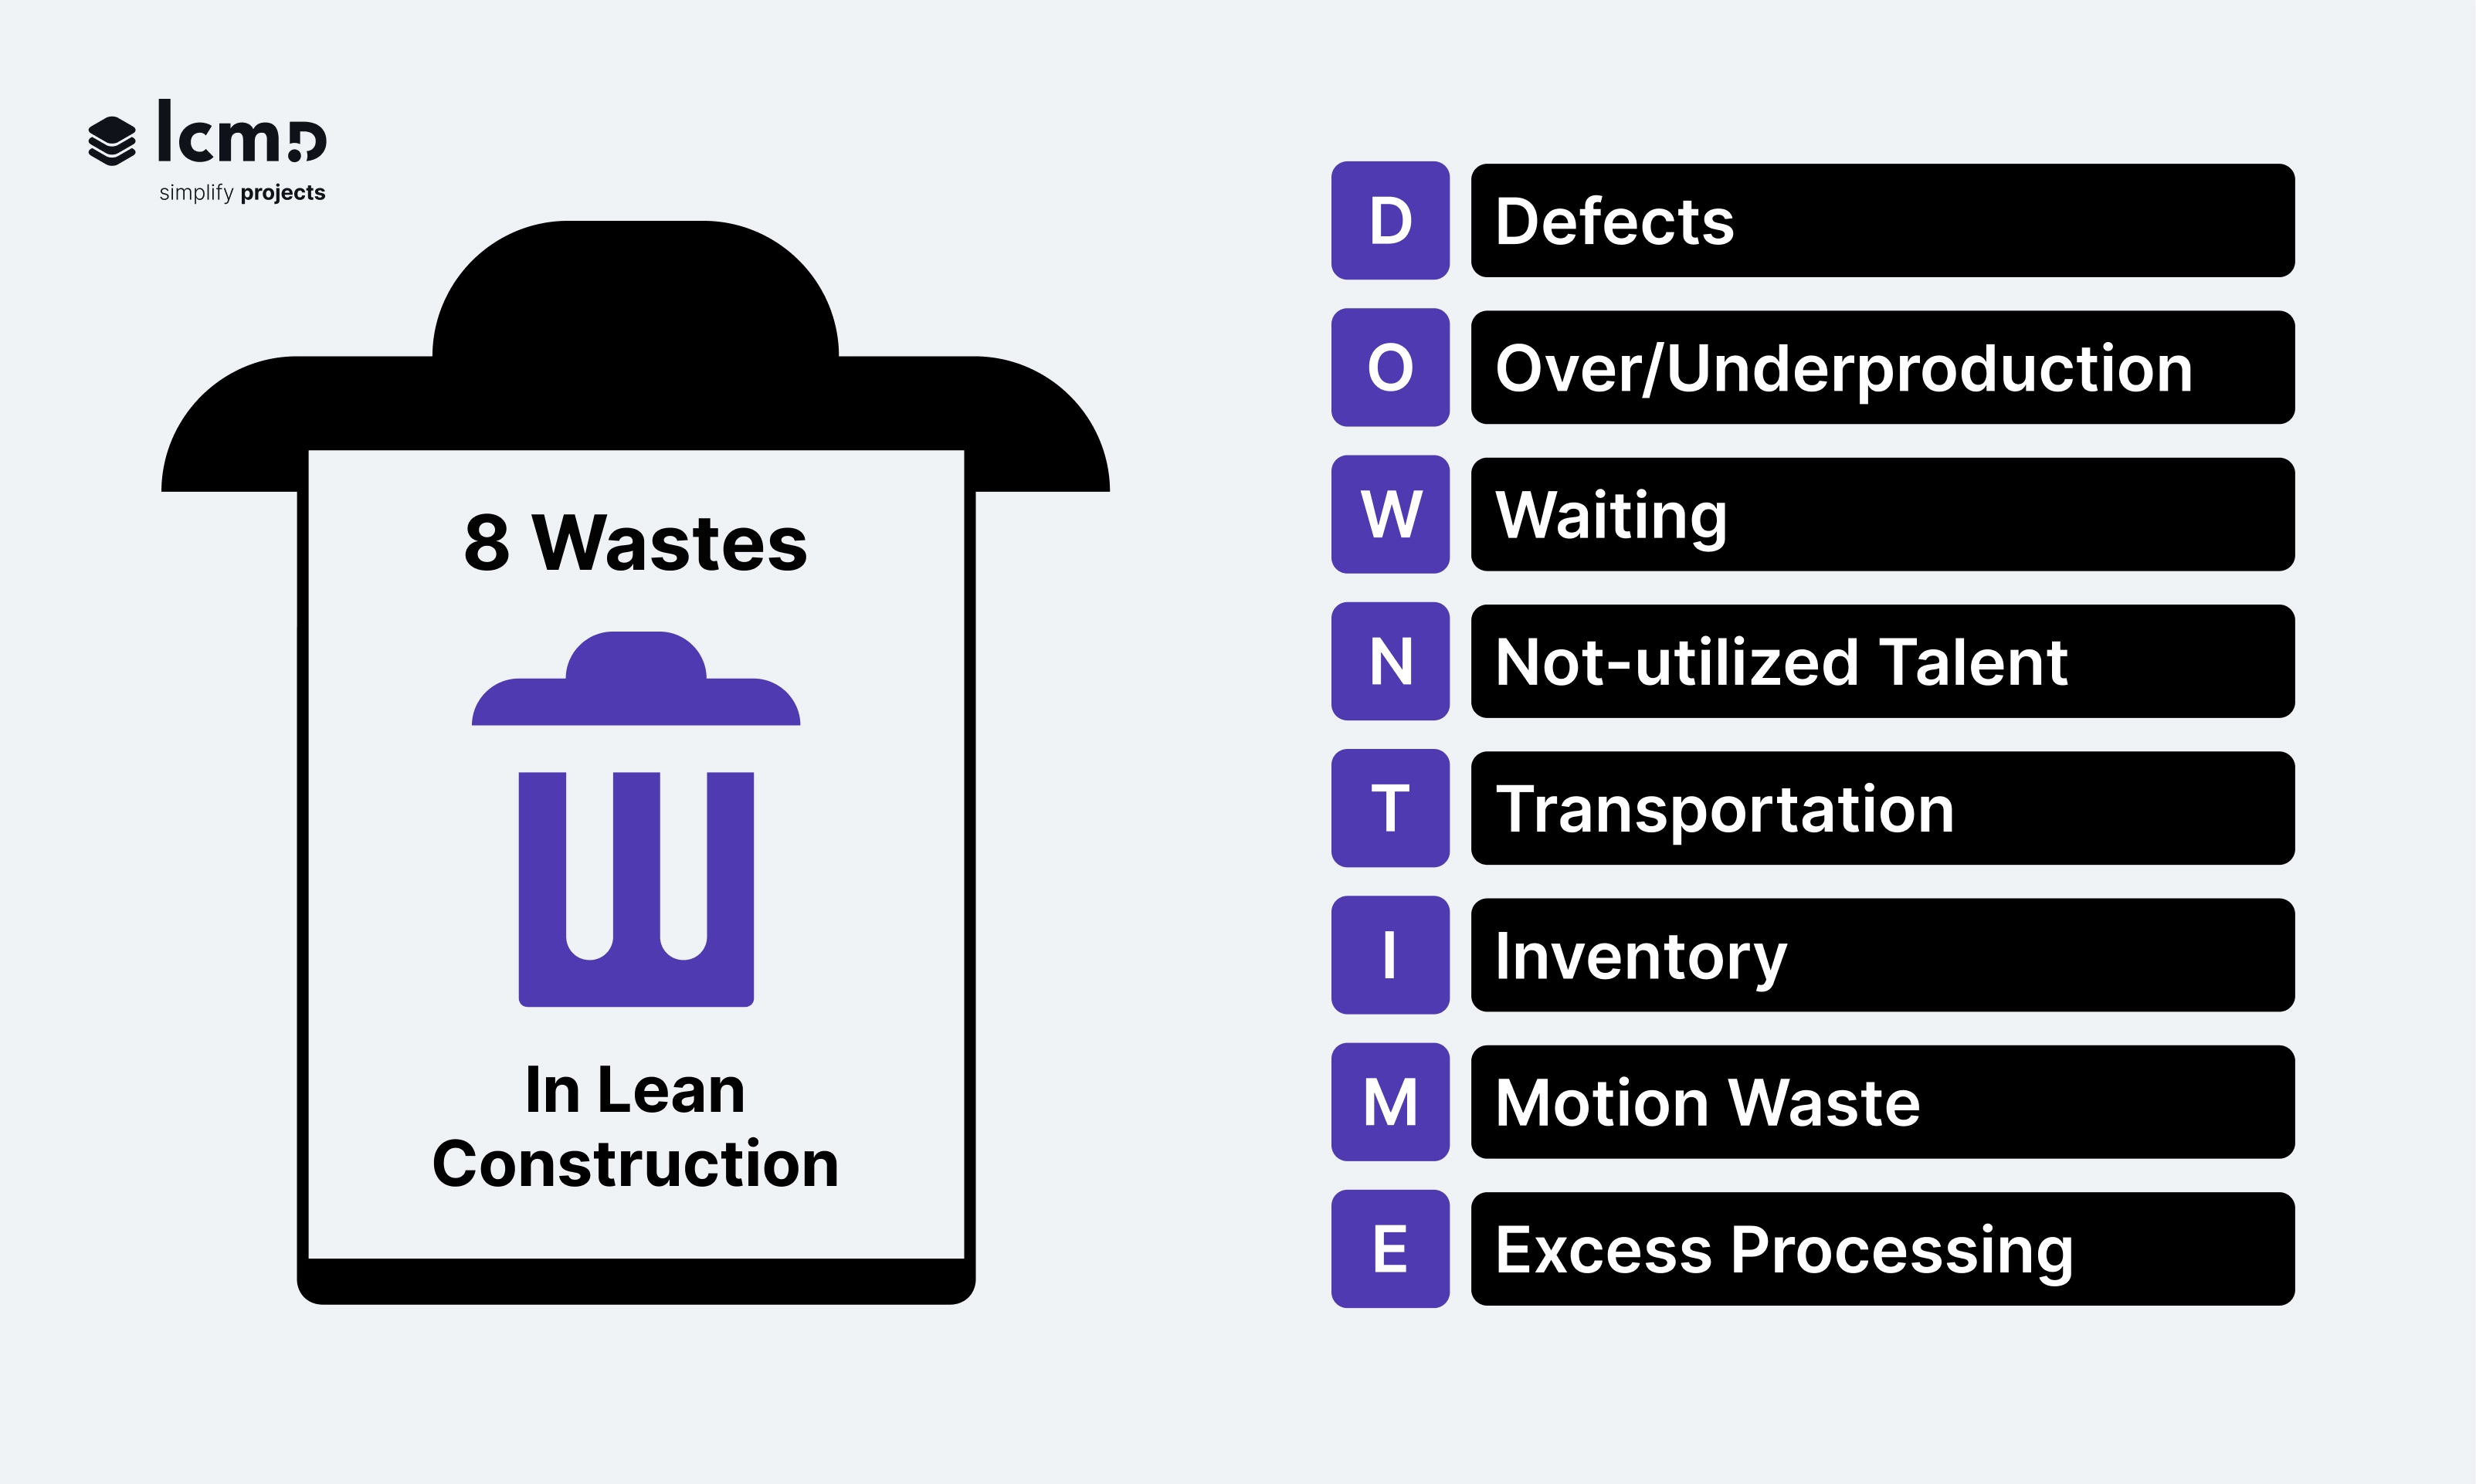
Lean management focuses strongly on waste reduction. In Lean methodology, “waste” means any activity or process that does not add value for the customer.
The classic DOWNTIME model groups these into 8 types of waste:
- Defects – errors or mistakes that require rework or extra checks.
- Overproduction – doing work earlier or in larger batches than needed.
- Waiting – people, equipment or materials standing idle.
- Non-utilised talent – not using people’s skills, experience and ideas.
- Transportation – unnecessary movement of materials or components.
- Inventory – materials or work in progress that sit unused and clutter the site.
- Motion – unnecessary movement of people and tools.
- Excess processing – steps or quality levels beyond what the client actually requires.
Lean practices aim to minimize waste and eliminate wasteful activities so that the same resources create more customer value and a more successful construction project.
The 5S method (Sort, Set in Order, Shine, Standardize, Sustain) is a practical way to make these wastes visible and easier to remove. By decluttering, organising and standardising work areas, 5S reduces delays, unnecessary motion, excess inventory and many sources of defects.
On well-run construction sites, 5S is not a one-off clean-up. It underpins safety, flow and reliable daily production – and creates the visual control you need before more advanced Lean construction practices can take hold.
Principles and waste reduction explain what should change. The third key concept – the Lean process improvement cycle – explains how you keep improving over time.
3. Continuous improvement cycle in Lean construction
Most Lean methodologies describe a similar continuous improvement cycle:
- Define the problem and customer value
- Map the current process
- Identify waste and root causes
- Design and test a better process
- Measure, learn and refine
In manufacturing industry contexts, this cycle is often applied to production systems and internal processes in factories. In the construction sector, we apply the same logic to project delivery and construction processes – from design coordination and look-ahead planning to daily crew assignments and site logistics.
In the rest of this guide, we’ll turn that cycle into eight practical steps tailored to construction projects. You’ll see how to move from abstract Lean principles to a concrete Lean process for planning, coordinating and delivering work on your construction sites.
From Lean Principles to a Continuous Improvement Cycle in Construction
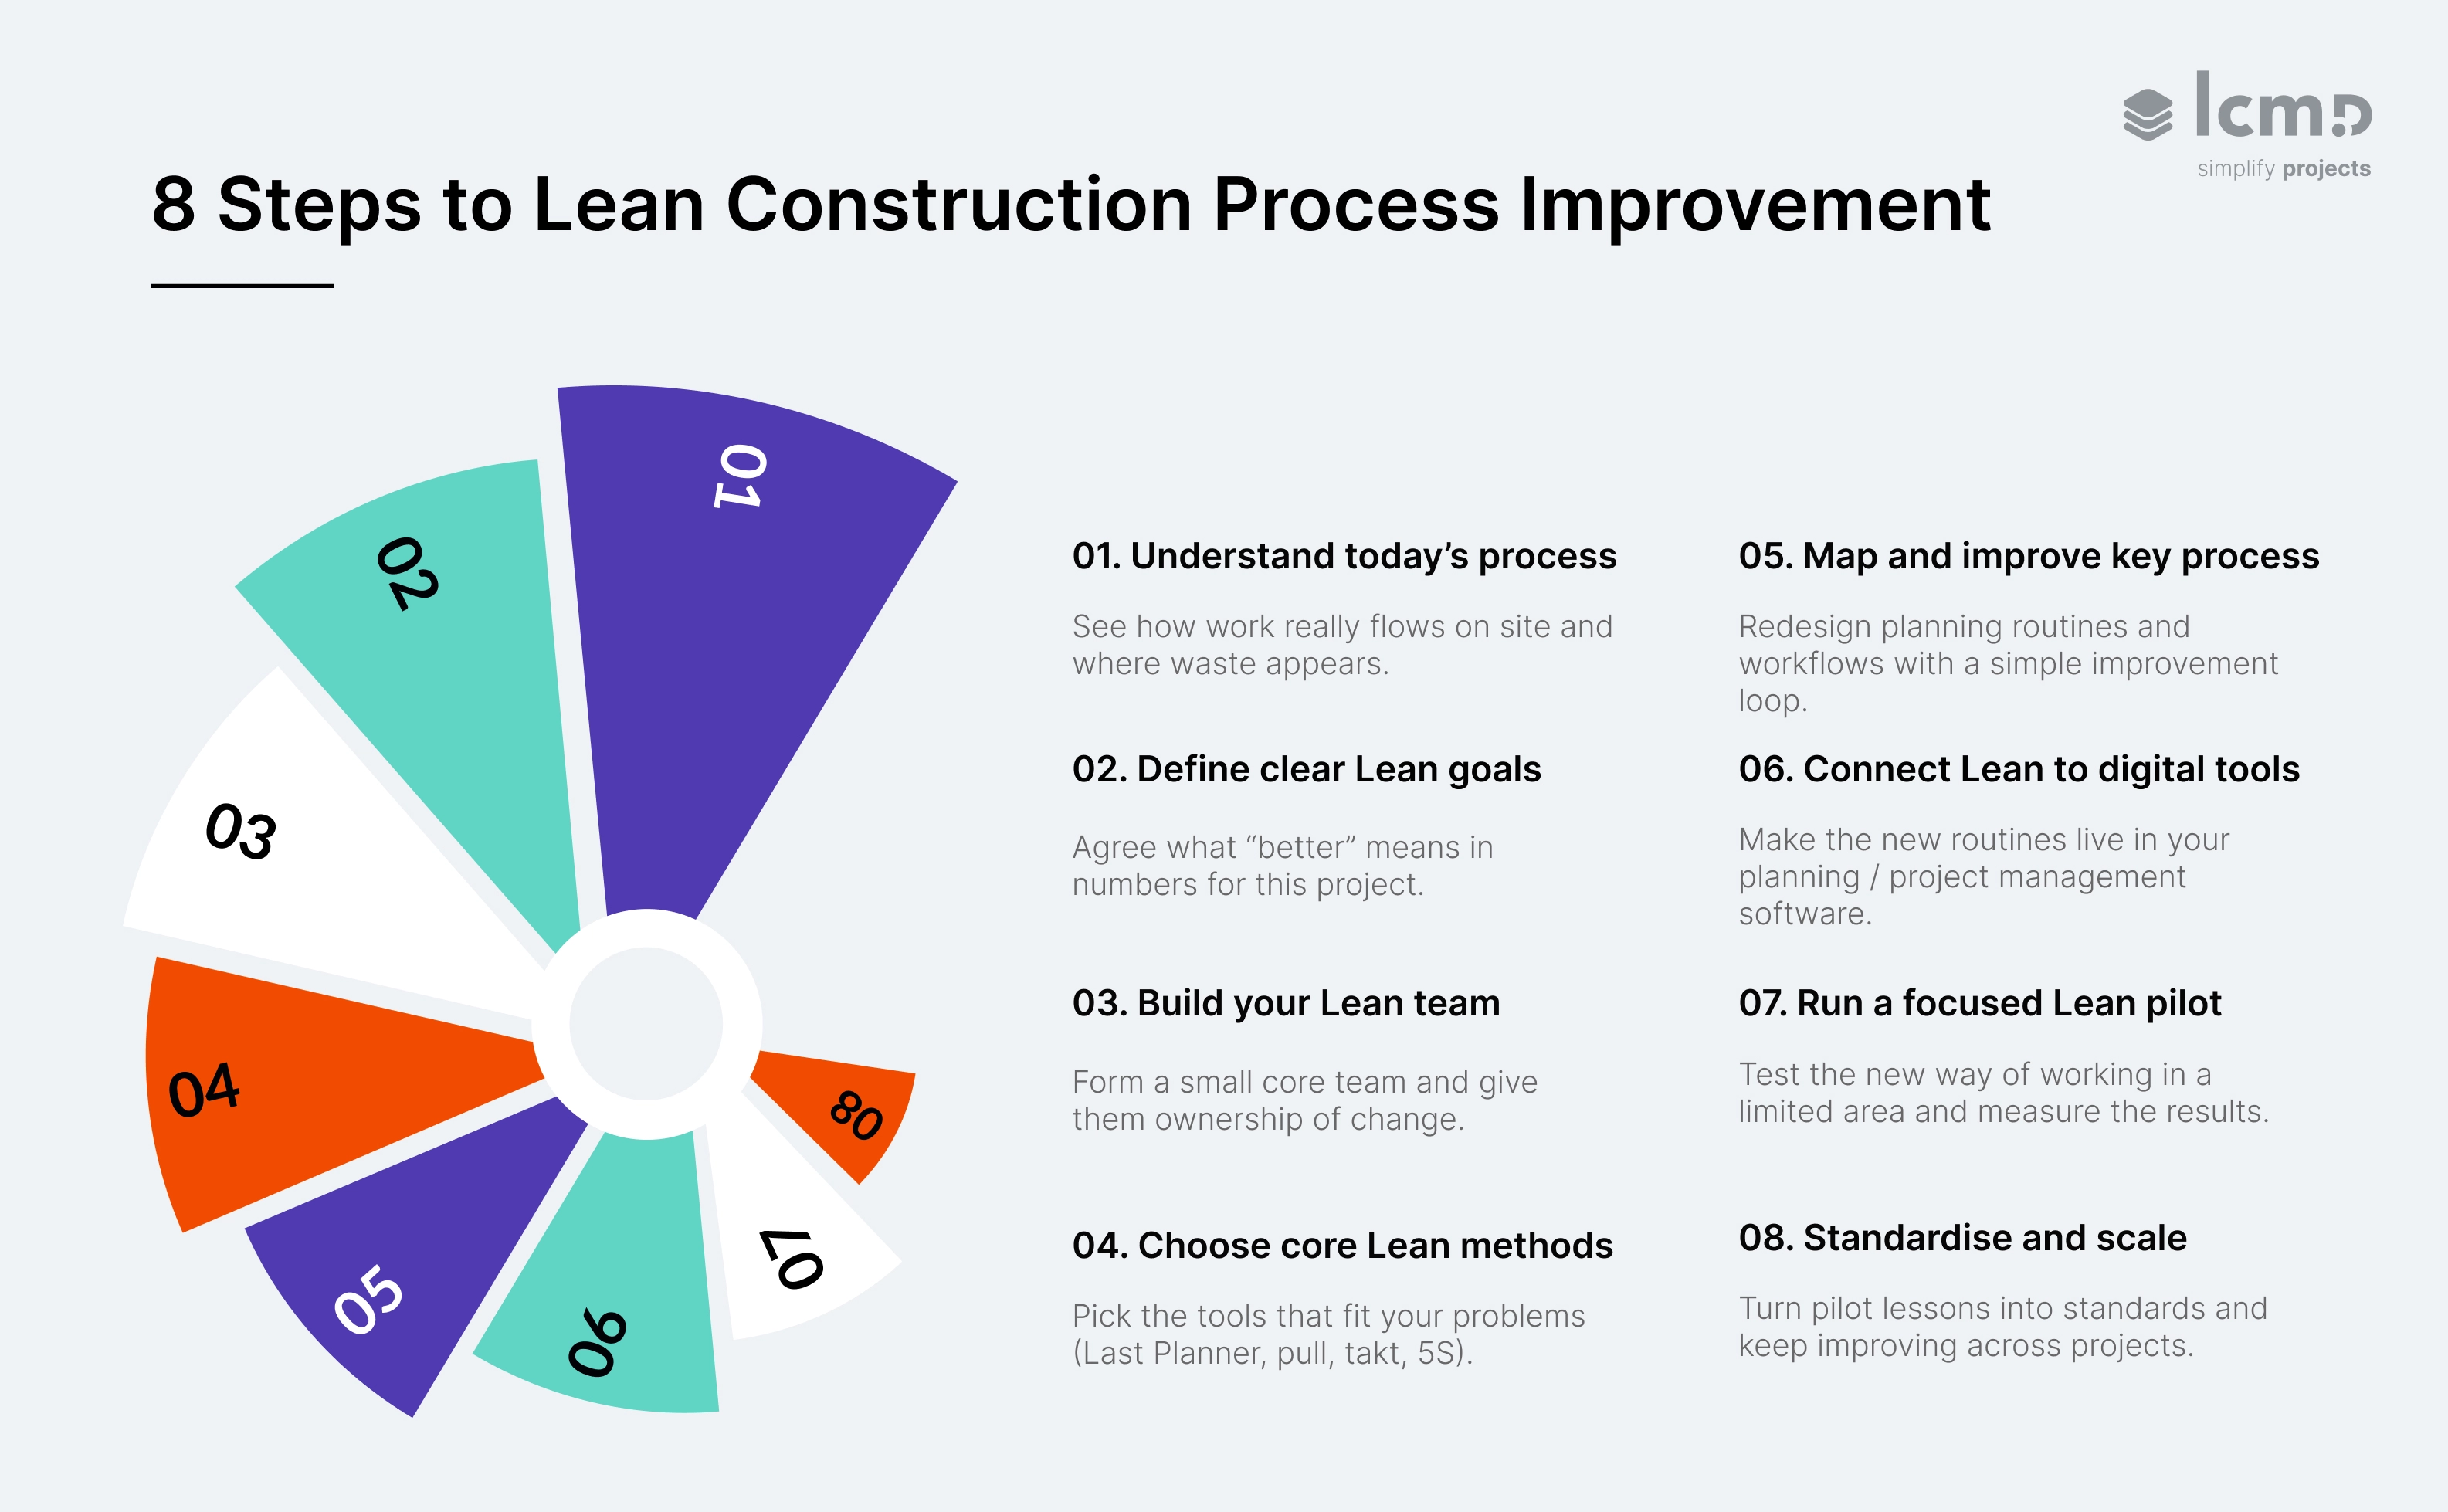
8 Lean process improvement steps for construction projects
These eight steps translate Lean principles, the 8 wastes and the continuous improvement cycle into a practical path you can follow on real construction projects.
Together, they form a lean process improvement methodology for construction that combines insights from Lean construction research, Last Planner and takt implementations with what consistently works in day-to-day construction management.
In simple terms, they walk you from diagnosing your current process to standardising what works:
- Understand where you are today (problems and waste) – see how your current construction process really works, not just how it’s planned.
- Define clear Lean construction goals – agree what “better” means in measurable terms for this project.
- Build your Lean team and mindset – create a small core team and give them the skills to lead change.
- Choose your core Lean construction methods – select a starter tool set (Last Planner, pull, takt, 5S) based on which tools fit your problems.
- Map and improve your key construction processes – redesign planning routines and workflows using a simple improvement loop.
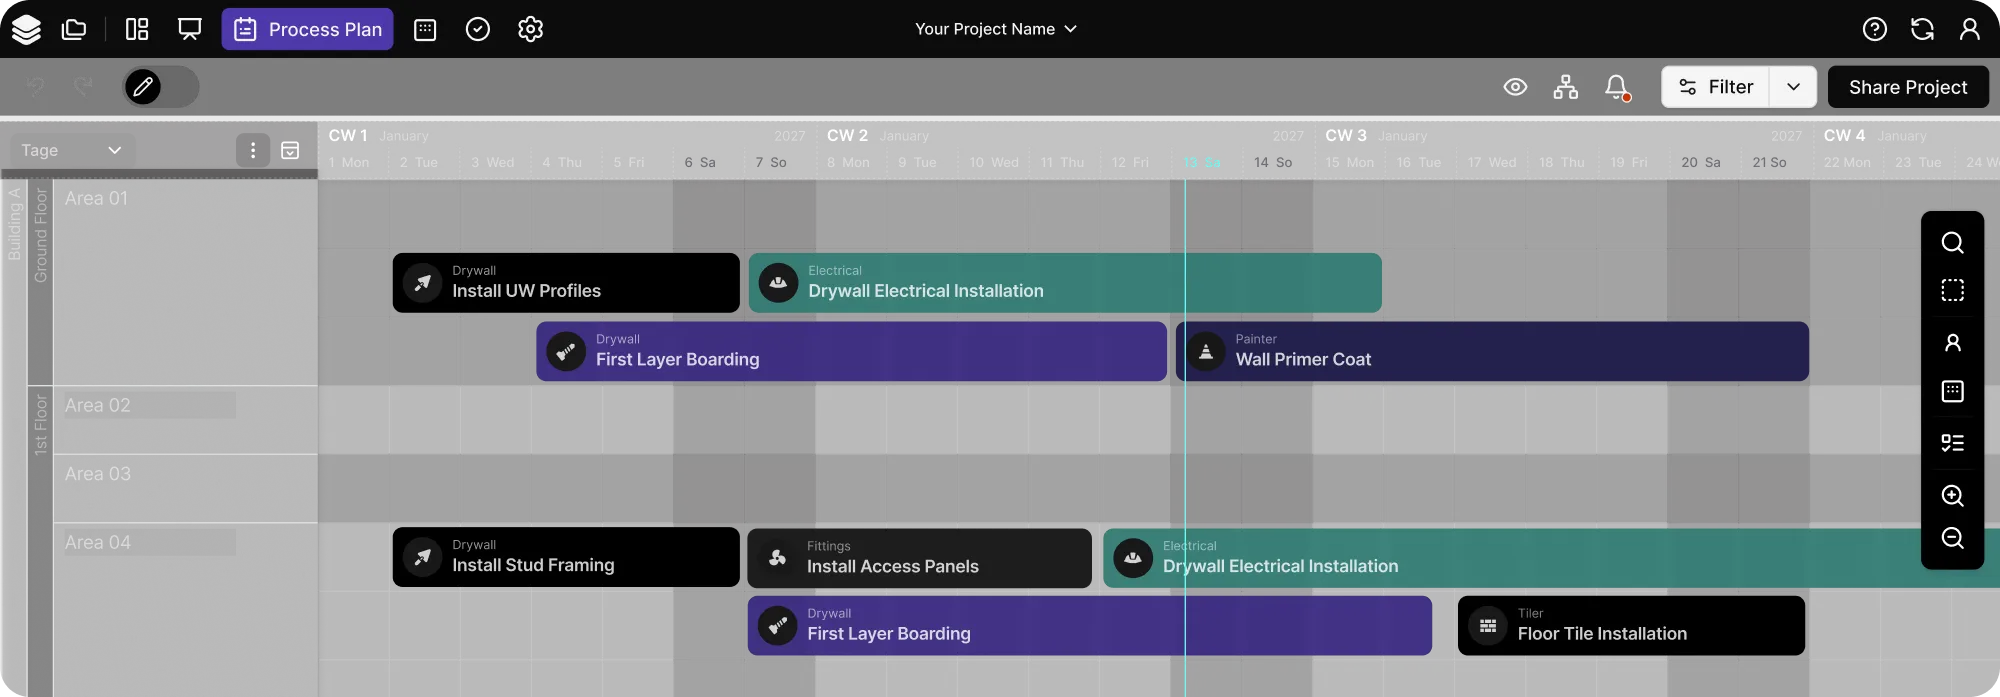
- Connect Lean routines to your digital project management tools – make sure your Lean process lives in your construction planning software, not only on the wall.
- Run a focused Lean pilot and measure what changes – test the new way of working in a limited scope and track results.
- Standardise, scale and keep improving – turn pilot lessons into standards and build continuous improvement into future projects.
Next, we’ll go through each step in more detail.
Step 1 – Understand Where You Are Today (Problems and Waste)
Lean process improvement starts with seeing your current construction process clearly. Step 1 builds a structured view of how work, information and materials flow on your construction site, where significant waste appears, and how that gap affects customer value and project delivery.
Why step 1 matters
If you skip this step, every Lean activity that follows is built on guesswork. Lean treats construction as a production system and draws on simple production management principles: you improve efficiency by reducing waste and variability, not by squeezing people.
A clear current-state picture shows where the process breaks down and gives you a baseline to measure performance later.
What to do in practice
Choose one critical, repeatable flow – for example corridor fit-out on a typical floor.
Walk that area with the site manager and trade leads and sketch a simple value stream map: when the area is released, which trades enter in which order, what information and approvals each step needs, how materials arrive, and when inspections and handovers happen.
Then review this map through the eight wastes lens you defined earlier:
- Where do crews wait for RFIs, drawings or materials?
- Where does inventory pile up and block access?
- Where is there unnecessary motion or transportation because storage is far from the workface?
- Where do defects trigger rework after inspections?
Close Step 1 with a short, clear problem statement, for example:
Corridor fit-out is slowed by waiting for RFIs, long walks to storage and rework after fire-stopping inspections.
This becomes the anchor for your Lean process improvement work in the next steps.
Step 2 – Define Clear Lean Construction Goals
Lean only works if everyone knows what “better” means. Step 2 is to define what success looks like for your project in concrete, measurable terms.
It turns your diagnosis into clear goals that link customer value, project delivery priorities and a small set of key performance indicators you can track week by week.
Why step 2 matters
Clear goals align the construction team around customer expectations (handover date, quality, cost, disruption) and give you a way to measure performance instead of arguing about opinions.
What to do in practice
Start with a short workshop with the owner, project manager and key trades:
- Ask what the client values most on this project: time, budget certainty, quality, flexibility, sustainability.
- Link this back to the problems you saw in Step 1: where does the current process fail to deliver that value?
Then set 2–3 project-specific Lean goals, for example:
- Increase PPC from around 55% to 75–80% in the pilot area within three months.
- Cut rework on a critical trade by 20–30%.
- Reduce average waiting time for approvals or materials in the pilot area by about 30–40%.
Then select a small set of KPIs that make these goals visible each week: PPC, number of open constraints, rework rate, cycle time for a repeated task, or throughput per area.
The exact targets depend on your baseline from Step 1; what matters is that they are realistic, agreed with the team, and clearly linked to problems you want to solve.
Step 3 – Build your Lean Team and Mindset
Tools and checklists don’t run Lean projects - people do. Step 3 is to create a small, committed Lean core team and develop the mindset and skills they need to lead continuous improvement on site.
Why step 3 matters
A Lean core team links goals to daily work: they keep focus on customer value, watch key indicators, and make sure problems are surfaced and solved instead of hidden.
What to do in practice
On most projects, the Lean team works best at around 4–8 people – small enough to make decisions quickly, but broad enough to represent planning, site execution and the client’s interests.
Start by confirming who belongs in that group:
- project manager and site manager
- planner or scheduler
- key foremen / trade leads
- optionally an owner or design representative
Align the team around the Lean construction goals from Step 2. Then give them a short, shared introduction to:
- spotting waste on construction sites
- the core Lean construction methods you will consider (Last Planner, pull planning, takt planning, 5S)
- basic visual management on site
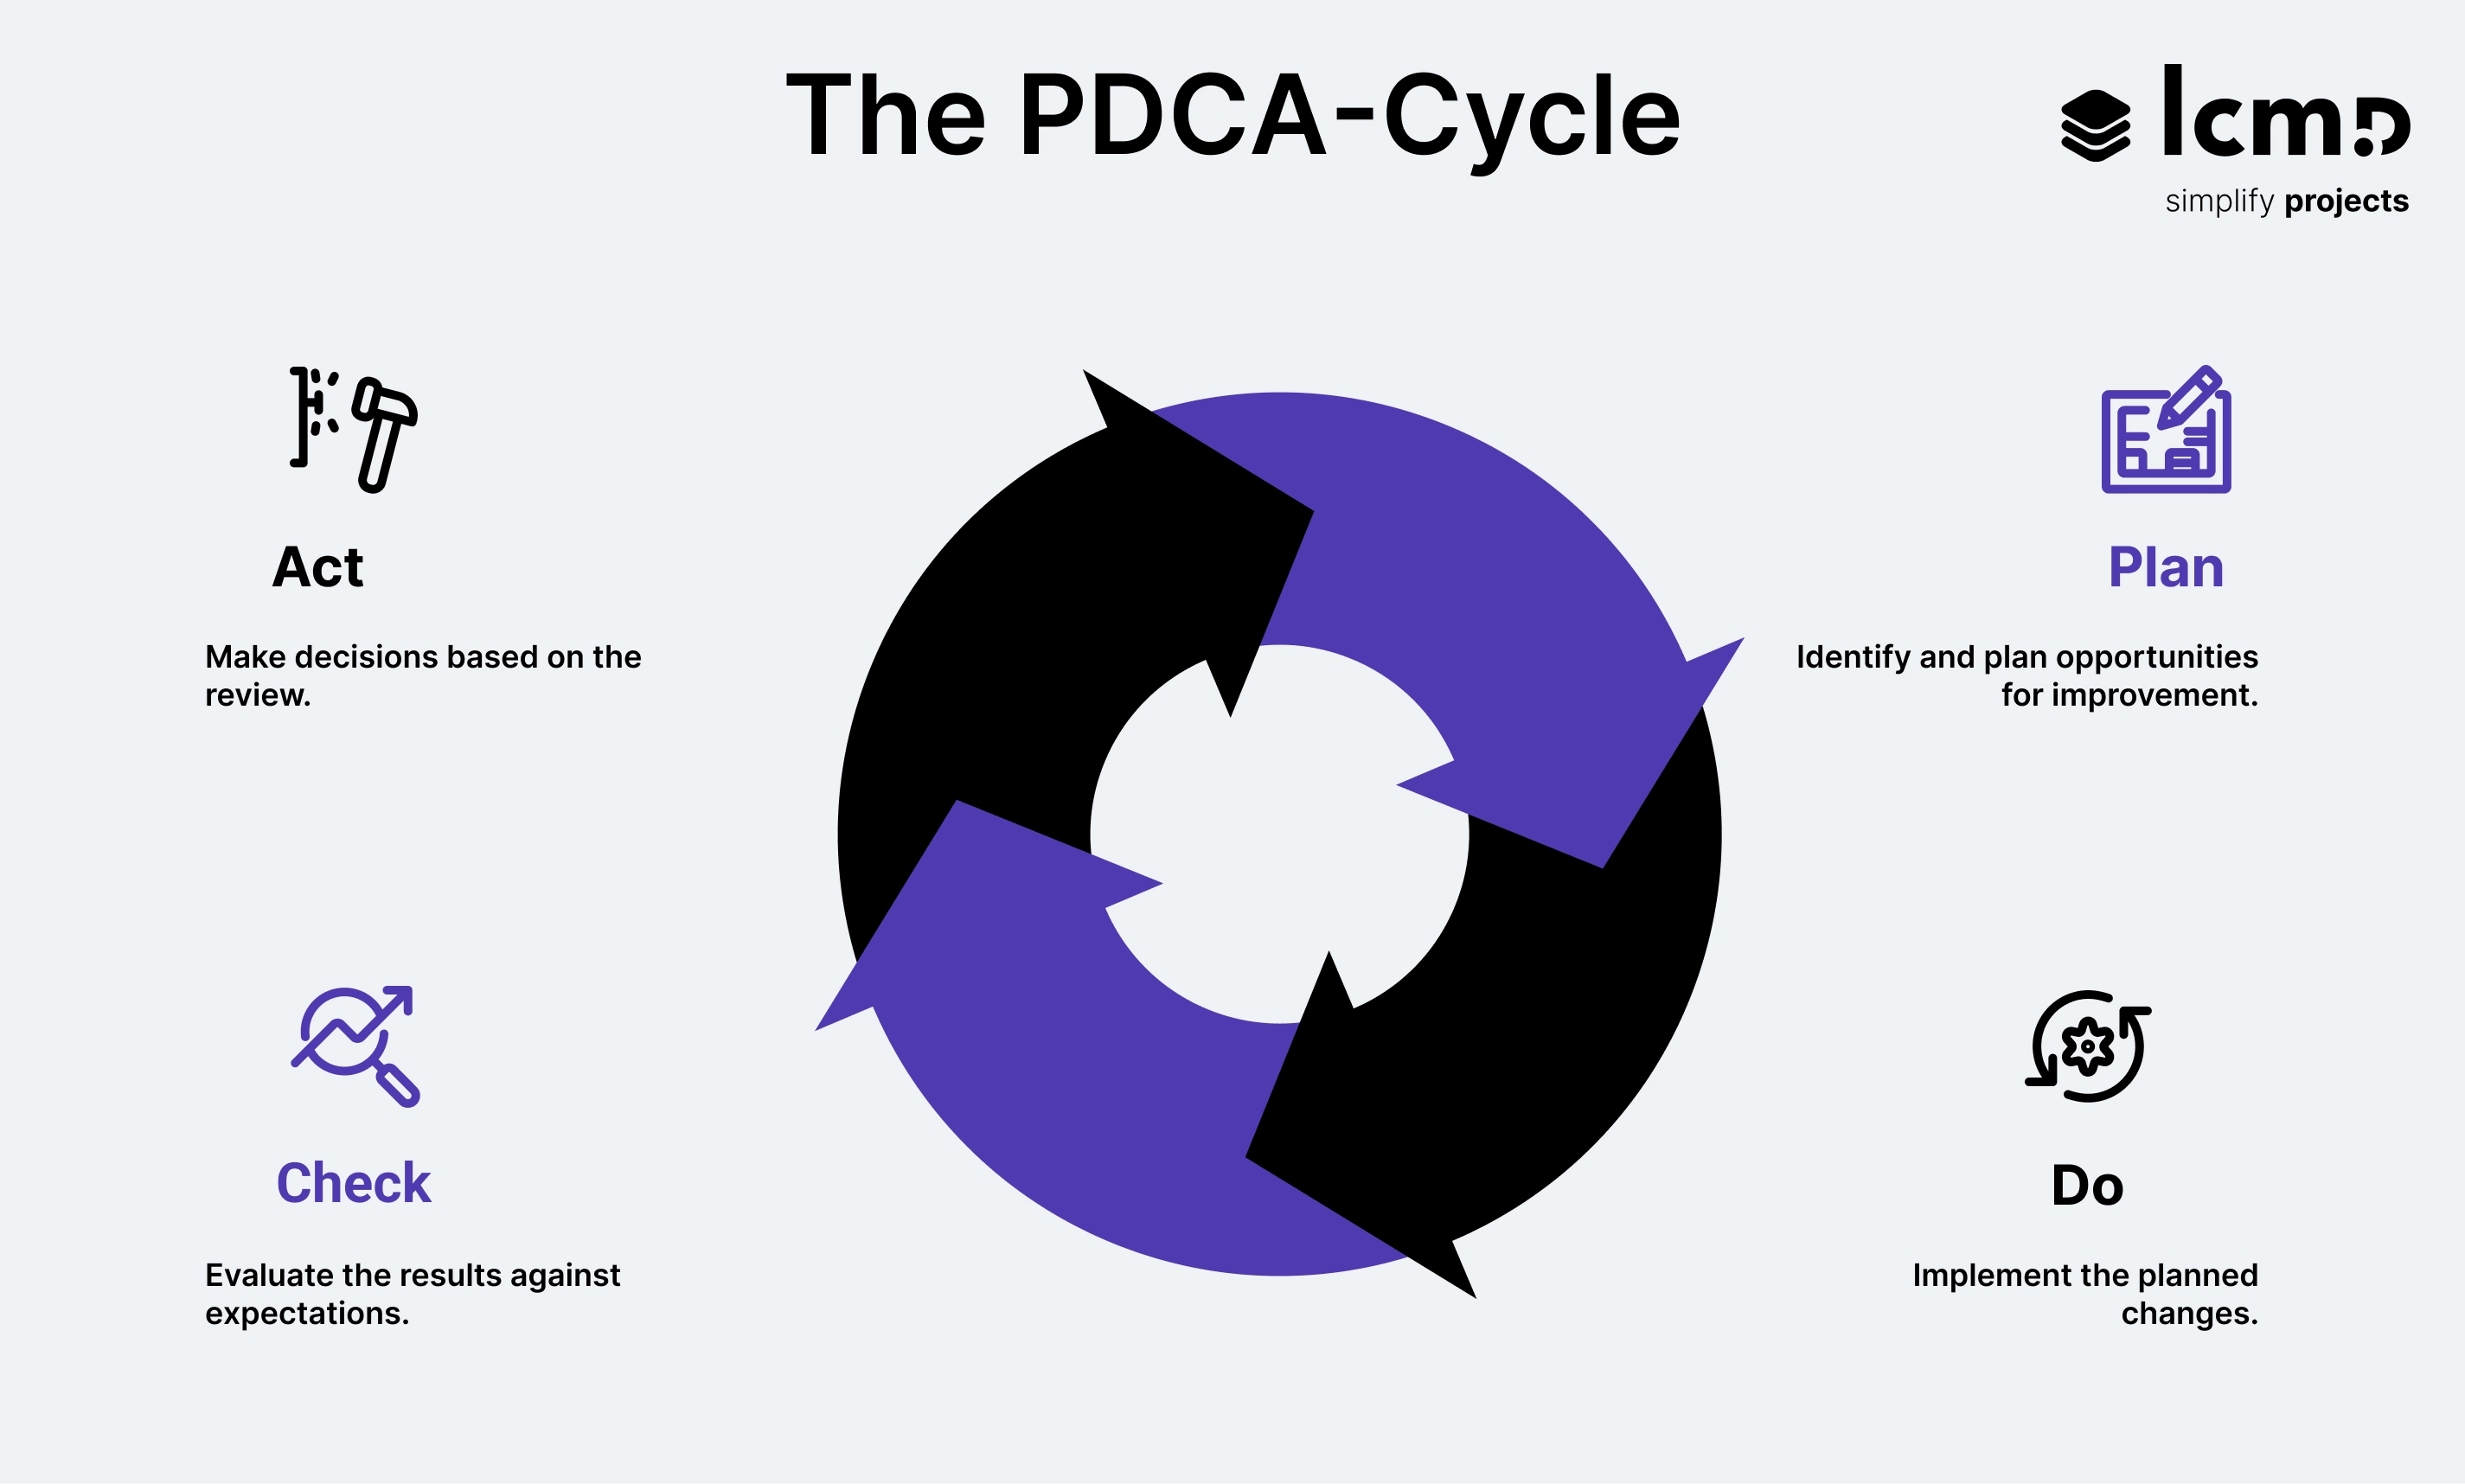
- the basics of continuous improvement cycle (plan–do–check–act/ measure–learn–refine)
Keep the focus practical. Short sessions, walkthroughs on site and simple examples work better than long classroom workshops.
Finally, agree on behavioural expectations: how meetings should run, how commitments are made and reviewed, and how problems are surfaced without blame. That mindset shift is often more important than any specific Lean tool.
Step 4 – Choose your Core Lean Construction Methods
After your team has a basic introduction to the main Lean construction methods, the next step is to decide which ones to actually use.
Step 4 is where the team selects a small set of methods that support the goals from Step 2 and address the main problems you diagnosed in Step 1.
Why step 4 matters
Choosing a focused starter set helps you improve efficiency where it matters most, minimise waste, and give the team a simple way to work differently on site.
What to do in practice
Ask your Lean core team to look back at the findings from Step 1 and group the main problems into three buckets:
- planning and reliability
- flow and coordination
- workplace and organisation
Then choose methods to match those patterns:
- If weekly plans often collapse or PPC is low, start with Last Planner and pull planning to create clearer commitments and reduce overloading.
- If trades constantly clash in the same areas or work stops and starts, add takt planning to create rhythm and more continuous flow across zones.
- If the site feels chaotic, with people searching for tools and materials or working around clutter, emphasise 5S and simple visual management.
These examples don’t cover every possible situation, but they give you a practical starting point. Treat your choice of methods as a hypothesis for this project: start small, see what changes, and adjust your Lean tool set as you learn.
Step 5 – Map and Improve Your Key Construction Process
Once you have Lean methods chosen, you need to apply them to concrete flows of work. Step 5 is where improvements become visible in the way you plan and coordinate day-to-day construction.
Why step 5 matters
If you never map and change a real process, Lean stays in workshops and slide decks.
By focusing on one priority construction process and running it through a structured loop, you give the team a clear example of how to spot waste, identify opportunities, solve problems and improve efficiency in practice.
What to do in practice
Remember the five-step continuous improvement cycle from earlier in this guide? Step 5 is where you use it on a real construction process.
Choose one priority process (e.g. bathroom fit-out, drywall installation, façade elements) and run a simple 5-step loop:
- Who relies on this output next (trade, client, inspector)? What do they need and when?
- Sketch a basic value stream or swimlane diagram: sequence of steps, information, hand-offs and approvals.
- Use the 8 wastes and the failure patterns from earlier steps. Where do crews wait? Where does inventory pile up? Where do defects or rework occur?
- Adjust sequence, hand-offs, batch sizes, information flow or zone layout. Decide where Last Planner, pull or takt planning should change the routine.
- Try the new way in one zone or area, then review the results and tweak.
Support this loop with regular coordination routines: look-ahead planning, weekly planning with commitments, and short daily huddles to check progress and surface issues.
Over time, these small cycles stabilise flow and make your construction process more predictable.
Step 6 – Connect Lean routines to your digital project management tools
Once your Lean routines are defined, they need somewhere to live. Step 6 is about making sure your construction planning software actually supports the way you want to plan, commit and track construction progress – instead of running Lean on the wall and the schedule somewhere else.
Why step 6 matters
When planning, commitments, constraints and PPC are maintained in different places, it becomes hard to see what is really happening on site or to sustain improvements.
Bringing Lean routines into your planning tool keeps what you planned, what was promised and what actually happened in one workflow the team uses every week.
What to do in practice
For your first Lean pilot, your planning tool should at minimum allow you to:
- visual plans by area and time (phases, zones, takt)
- clear ownership and commitments for each activity
- constraints and actions tracked against future tasks
- progress updates from site (done / not done / blocked)
- simple metrics such as PPC and rework
If you already use some Lean construction software, configure it around these needs and use it to reflect your Last Planner, pull or takt routines after each coordination meeting. If you don’t have a tool yet, use the checklist above when evaluating options.
Top construction project management tools like Lcmd are built around this pattern – combining visual takt and pull views, constraint handling, field updates and simple analytics – so teams can run their Lean process without extra spreadsheets or side systems.
{{cta}}
Step 7 - Run a Focused Lean Pilot and Measure What Changes
By now you’ve designed a Lean way of working and connected it to your planning tool. Step 7 is your first real-world test under controlled conditions: you take everything from Steps 1–6 and run it as a formal experiment in a defined part of a live project.
Why step 7 matters
A focused test gives you a safe space to try new routines, creates before/after data instead of opinions, and a shared example you can later standardise and scale.
What to do in practice
- Choose a pilot scope - Pick something manageable and repeatable
- Agree a start and end period - e.g. 8–12 weeks) so you can compare performance over time.
- Apply your new way of working - Inside that scope, don’t design anything new: use the goals from Step 2, the Lean team from Step 3, your methods from Step 4, the process work from Step 5 and the tool setup from Step 6.
- Track metrics and run structured feedback sessions - Follow a short set of metrics: PPC in the pilot area, number and age of open constraints, rework or defect rates, and a flow indicator such as cycle time or throughput per zone.Every few weeks, hold short reviews with trades and site managers:
- What became easier?
- What is still painful?
- Which routines or boards are used, which are ignored
Document 3–5 concrete lessons – both positive and negative.
Treat this pilot as your first full continuous improvement cycle, not a one-off experiment. Step 8 will then take what you’ve learned here and turn it into standards and training for future projects.
Step 8 – Standardise, scale and keep improving
The final step is to lock in and spread what worked in your pilot. From this pilot, what becomes our standard? And how do we keep improving over time? Step 8 turns hard-won lessons into simple routines that survive beyond one project or one enthusiastic team.
Why step 8 matters
Lightweight standards make good practices easier to repeat, help new projects start stronger, and keep improvement tied to real site experience rather than abstract theory.
What to do in practice
- Capture what worked in simple formats - Create standard agendas for planning and coordination meetings, checklists for 5S, constraint reviews and handovers, and templates for look-ahead plans, weekly plans and PPC tracking.
- Introduce standards on new projects - Use light training and coaching from people involved in the pilot. Adapt details to each project, but keep the core routines and metrics stable so results remain comparable.
- Set up regular review cycles - Hold short retrospectives at key milestones, maintain a simple “lessons learned” log linked to processes, and periodically review Lean metrics across projects to spot trends.
Use these reviews to decide what to keep, what to change, and which ideas to test next.
Conclusion
In the end, Lean is less about tools and more about how you choose to run tomorrow’s work compared to yesterday’s. Each project becomes a chance to test a better way of planning, talking and deciding together.
This is how you achieve continuous improvement in the construction sector: not through one-off Lean campaigns, but through small, repeatable changes that accumulate across projects and future teams.
Selected Lean construction Resources
- Issa, U. H. (2013). Implementation of Lean Construction Techniques for Minimizing the Risks Effect on Project Construction Time. Alexandria Engineering Journal, 52(4), 697–704.
- Moradi, S., & Sormunen, P. (2023). Implementing Lean Construction: A Literature Study of Barriers, Enablers, and Implications. Buildings, 13(2). MDPI.
- Mano, A. P., et al. (2024). Barriers to Lean Construction: A Systematic Literature Review. Journal of Lean Systems, 9(1), 1–19.
- Sarhan, S., & Fox, A. (2013). Barriers to Implementing Lean Construction in the UK Construction Industry. The Built & Human Environment Review, 6, 1–17.
- Wandahl, S. (2014). Lean Construction with or without Lean – Challenges of Implementing Lean Construction. In: Proc. 22nd Annual Conference of the International Group for Lean Construction (IGLC22), pp. 97–108.